Warning: Pre-Alpha
This game is currently in pre-alpha, and at this time, I do not recommend running a game in it yet. Every single game mechanic and piece of lore is subject to potentially breaking changes.
Thank you for your interest in this game! You can follow its development at https://www.youtube.com/@trekiros
-Trek
Attribute Rolls
 When your character attempts a task where the outcome is undetermined, the Plot Twister may ask you to roll an attribute. To roll an attribute, roll a d12, and add your Attribute's value to the result.
Difficulty Class (DC). The number you need to beat depends on the difficulty of the task:
- Easy: 8 or above
- Medium: 10 or above
- Hard: 12 or above
Pushing your Luck. When you make an attribute roll, if the number on the d12 is less than or equal to your Luck, you can choose to push the roll. If you do, flip a coin.
- On heads: the number on your d12 is changed to whichever number is the lowest number that can grant you a success.
- On tails: your roll becomes something even worse than a critical failure: a mishap. Whatever you were attempting fails, AND you also suffer some extra negative consequences at the discretion of the Plot Twister.
Rules Reminder
If you have an ability which lets you reroll, you must choose whether or not to reroll before you decide whether or not to Push your Luck.
Contested Rolls. When one creature attempts to do something which another creature could resist, instead of the Plot Twister choosing a difficulty for the task, the Plot Twister uses a stat block to determine the difficulty for that task. This is called a Contested Roll. A Contested Roll always mentions which attribute is being used to contest, and which attribute is being contested. The difficulty for that roll is equal to 8 + the corresponding attribute's value.
Only players roll during contested rolls: if a PC contests an NPC, the player rolls, and if they succeed, the PC is successful. If an NPC contests a PC, the player rolls, and if they succeed, the NPC fails.
Certain circumstances might grant advantage, or disadvantage, on an attribute roll or on the damage roll of an attack. These could be the result of a creature's traits and features, or given out at the Plot Twister's discretion.
Having advantage means you make the roll twice, and take the highest result. If you have multiple advantages, you make the roll thrice instead.
Having disadvantage means you make the roll twice, and take the lowest result. If you have multiple disadvantages, you make the roll thrice instead.
If you have both advantages and disadvantages, they cancel out. For example, if you have 3 advantages and 2 disadvantages, the 2 disadvantages cancel 2 of your 3 advantages, so you have a total of 1 advantage. In that example, you would roll twice and take the highest result.
Rules tip: Advantages on attacks
If you have advantages or disadvantages on the attack, you make the entire roll twice (or thrice with multiple advantages or disadvantages).
Since damage die can explode when you roll their maximum value, each of those rolls can, individually, include explosions.
For example: the shotgun deals 2d4! damage. A shotgun attack with advantage might look something like this:
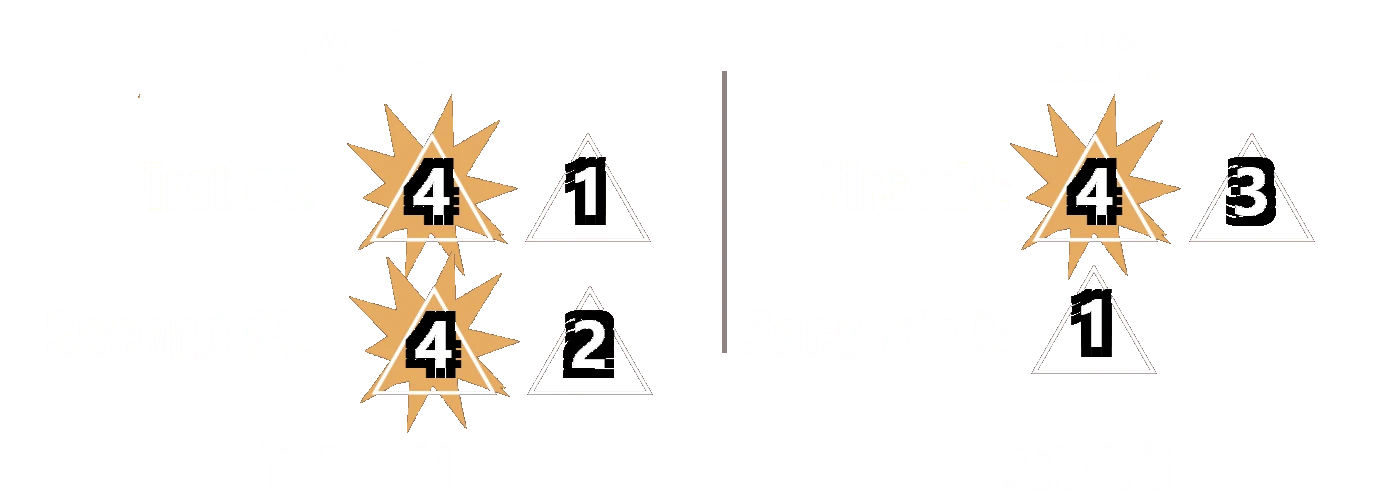
In this example, both rolls had explosions, but because the first roll is higher overall, the attack deals 11 damage.
When an ability allows you to make a reroll, you make the roll again, and must use the new result even if it is worse. If the original roll had advantages or disadvantages, so does the reroll.
If the original roll was an attribute roll, you must choose whether or not to reroll before choosing whether or not to Push your Luck.
Critical Success. Whenever a dice is rolled, if you roll the maximum value for that dice, this is called a critical success.
Critical Failure. Whenever a dice is rolled, if you roll a 1, this is called a critical failure.
What happens on a critical success or a critical failure depends on what the roll was for. See the sections for how to design a roll, and for attacks, for more detail.

At the end of each game session, and before you take a break if your session lasts long enough for one, the players vote for one player to receive "inspiration". A player cannot vote for themselves, and if the vote is tied, the Plot Twister breaks the tie by adding their vote. When a player receives inspiration, if another player already had unused inspiration, the previous inspiration is lost.
After you or a creature you can see makes an attribute roll or a damage roll, you can spend your inspiration to force a reroll.
Note
The criteria used for the vote is left up to the players:
Good roleplay, having made clutch moves in combat, or a pity-inspiration for someone who's been having a really bad day, are all perfectly valid reasons to give someone inspiration.
When a player pushes their luck and fails, here are some examples of negative consequences the Plot Twister can default to. The Plot Twister can roll to randomly select one mishap, or select one that fits the current situation.
If, based on the current situation, the Plot Twister can come up with more interesting mishaps that tie into the narrative, it is usually better to do such instead of using these tables.
The mishaps are divided into three tables: one with effects typically more appropriate for combat scenes, one with effects that tend to fit exploration scenes better, and one with effects most suited to negotiation scenes.
| 1d6 | Combat Mishaps |
|---|---|
| 1 | Hurt yourself. You lose 1 hit point |
| 2 | Butterfingers. The weapons or items you were holding are thrown 3 meters away in whichever direction is the least convenient for you. |
| 3 | Left yourself open. Until the end of your next turn, attacks made against you have advantage. |
| 4 | It's not your day. Until the end of your next turn, you have disadvantage on all attacks and attribute rolls. |
| 5 | Hit your head. You are stunned and dazed until the end of your next turn. |
| 6 | Friendly Fire. You accidentally attack one ally of the Plot Twister's choice, with advantage. Doing this costs AP as usual - if you don't have enough AP to attack, the AP are taken from your next turn. If no allies are in range, you attack yourself. |
| 1d6 | Exploration Mishaps |
|---|---|
| 1 | Hurt yourself. You take 1 wound. |
| 2 | Made some noise. You made so much noise that some nearby enemies noticed and are starting to head in your direction. |
| 3 | Set back allies. Whatever you did was the opposite of helping. The next attribute roll made by an ally has disadvantage. |
| 4 | Broken toys. One item in your inventory, chosen by the Plot Twister, is broken. It can't be used until you finish a long rest. |
| 5 | You blew it. Something explodes. Or, the floor collapses under your feet. Or, you caused the ceiling to cave in. Either way, everyone within 5m of you takes 3d6! damage. |
| 6 | New obstacle. Whatever you did created a new obstacle: maybe you caused the floor to collapse, cutting your escape route. Or you accidentally caused a coolant pipe to start leaking, creating a puddle of chemicals between you and your objective, for example. |
| 1d6 | Social Mishaps |
|---|---|
| 1 | Accidental discharge. You accidentally attack the person you were trying to negotiate with. |
| 2 | Old "friends". The person you were talking to suddenly recognizes you as someone they knew in the past. And they didn't like what you did to them. |
| 3 | Revealed too much. One secret you were trying to hide, chosen by the Plot Twister, is accidentally revealed. |
| 4 | Backfire. You lose all favors you had with that person, or with another NPC they happened to know, that you had favors with. |
| 5 | Offended. You offended the other party, hardening their stance. They demand reparations before you can continue with what the negotiation was originally about. |
| 6 | They had backup. The conversation lasted just long enough for someone else to get here. And they're exactly the person you didn't want to show up. |